What can you emulate on an Xbox Series S/X?
There’s a ton that an Xbox Series S and X can emulate.
For example:
- RetroArch (GB/GBC/NES/SNES/PS1/SEGA etc.)
- Dolphin (GameCube/Wii)
- PPSSPP (PSP)
- XBSX2 (PlayStation 2)
- Xenia Canary (Xbox 360)
Limitations?
Not really no.
You click the Dev mode application from your Xbox home screen, and you can boot into that to play all your emulated games then leave the Dev mode to head back to Retail mode to play your Xbox as normal.
What do you need?
There’s a few things you need:
- Xbox Series S/X (of course – try and find a used one for cheap!)
- USB Drive – can be a portable SSD, external hard drive, large USB drive, SD card with SD card reader – anything that connects via USB-A
- Windows PC
Installing Dev mode
So, to start, we need to get Dev mode installed.
From the Xbox home screen, search for the Dev mode app using Y and you should see the green Xbox Dev Mode. Install it.

Launch the app and click Next. Next again.
Jump onto your computer and type in the address that’s on screen, login with your Xbox account.
You’ll be at the Microsoft Partner center home screen.
Getting a developer account
Open a new tab and this time head to the Microsoft Store Developer page.
Thanks to this months change, developer accounts are now free, so there is no cost to you to do this. It used to cost $20, no more, all free.
Choose Individual Developer and click Continue.

Login with your Xbox email account.
You now will likely need to verify yourself, I did – take a picture of your ID, take a selfie, all that fun stuff.
Then just fill out your profile information, your publisher display name can be whatever you want.
Then you’re all done and click Go to Partner Center Dashboard.
Now that we’ve done that, once again paste that address that we saw on the Xbox screen.
You should be on the Manage Xbox devices screen, click the plus icon on the right and add the code that you have on screen. You might need to click get new code by reopening the Dev kit app.

You should now see your Xbox there on the webpage when it’s successful.
On your Xbox – Dev mode
Head back to your Xbox and you should see Switch to developer mode, so click Switch and restart.

You’ll see an entirely new screen, this is the Dev mode home page.

If you’re on WiFi, head to Settings > Launch Settings > General > Network Settings > Setup wireless network and connect to your WiFi. Ethernet users are fine, you should have internet automatically.
Head back to home and we need to add our Test account. Click Add existing and login with your Xbox account. You should see it on home after.

Next up head to Remote Access Settings and have both checkboxes enabled and give a username and password for the authentication. We’re going to use this to install apps remotely. Close out.

On your PC – formatting the USB drive
We now need to setup our USB drive, or portable SSD, whatever you have.
Connect your USB drive to the PC, right click it in File Explorer and select Format. Choose NTFS as the File System, call it XBOX as the Volume Label and click Start.

When it’s done, head into your File Explorer, and right click your USB drive then select Properties and head to the Security tab. Go to Advanced > Add > Select Principal > Advanced > Find Now > All APPLICATION PACKAGES > OK > OK and enable the Full Control box then click OK and enable Replace all child object permission entries and then OK. Ignore the error, click continue and ignore the error.

On your PC – adding games/BIOS/emulator folders
Remove the drive from the Xbox and insert back into the PC.
Head into that USB we just formatted and create a folder called Games.

This is where you’ll want to put your Games/ROMs – so I’d suggest creating folders for each system like gb for Game Boy, gba for Game Boy Advance, gc for GameCube, wii for Wii and so on and so on.
Then inside each of those folders, you want to put your games.

For a larger discussion about ROMs and BIOS files, check out the below.
Head to the root of the SD card and also create a folder called Dolphin, which we’ll use to store Dolphin emulator information.
Do the same thing and create a folder called Xenia, for Xenia Canary.
Do the same and create one called XBSX2.
Then, inside of that XBSX2 folder, create the following folders:
- BIOS
- Cheats
- GameSettings
- States
- MemoryCards
Copy your PS2 BIOS files to the BIOS folder we just created.

Then create a RetroArch folder, and inside, create the following folders:
- cheats
- config
- saves
- states
- system
Copy your RetroArch BIOS files to the system folder we just created.

Adding emulators and apps
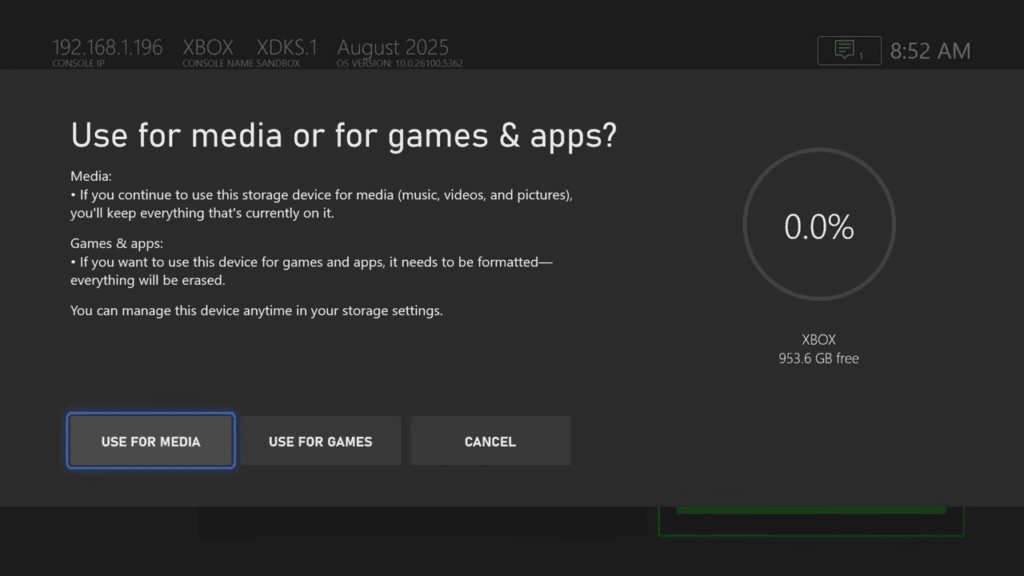
Safely eject and insert into your Xbox, and make sure that you select for Media use, not for Games use.
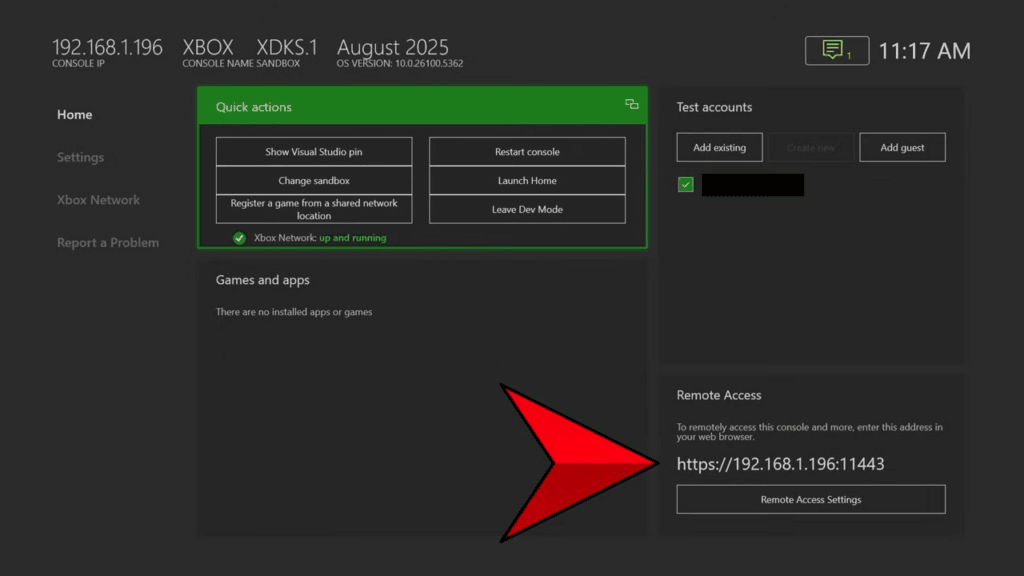
Make note of the Remote Access IP Address on the right side, and type that URL into your Windows PC browser.
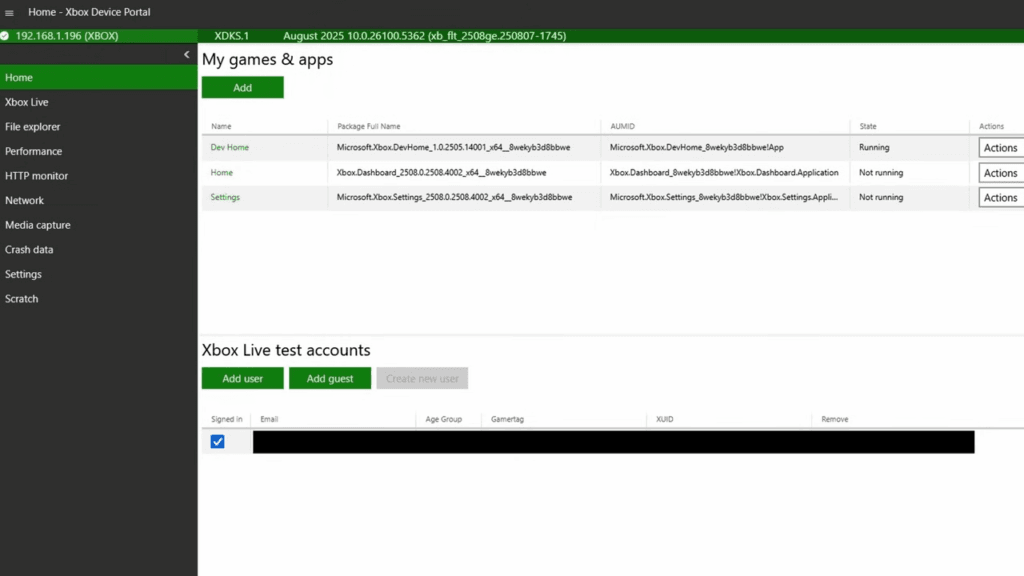
You now need to sign in with the username and password we setup earlier for remote access.
Now you’ll see your Xbox device portal and we can now add things.
Head to the https://xbdev.store/ and scroll down to Emulators.
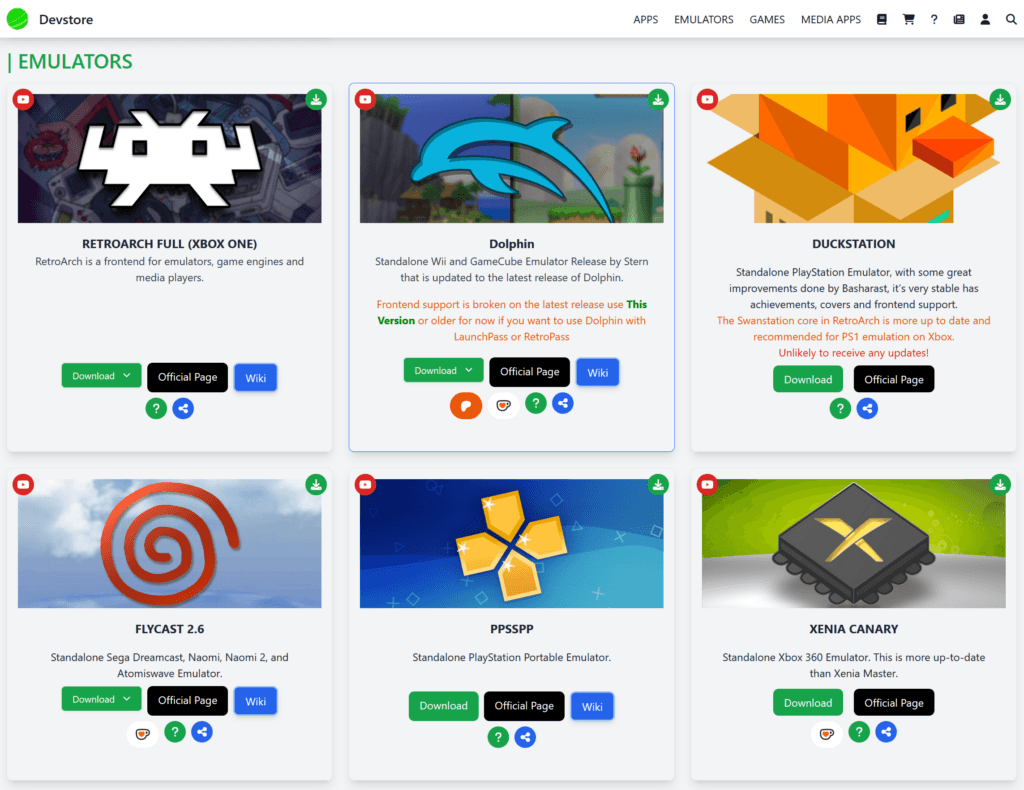
You can now see a list of emulators that we can install if we want.
Scroll down to RetroArch Full (XBOX SERIES S/X) and click Download from Here.

Feel free to head back and find any other emulators you want as well.
For example, I want Dolphin so clicking Download from Here for GameCube and Wii emulation.

PPSSPP for PSP.

Xenia Canary for Xbox 360 emulation, I know, the irony of using an Xbox Series S to emulate Xbox 360.

XBSX2 for PS2 emulation and as of today, that’s about it – the rest of the emulators are all in alpha or not great states.

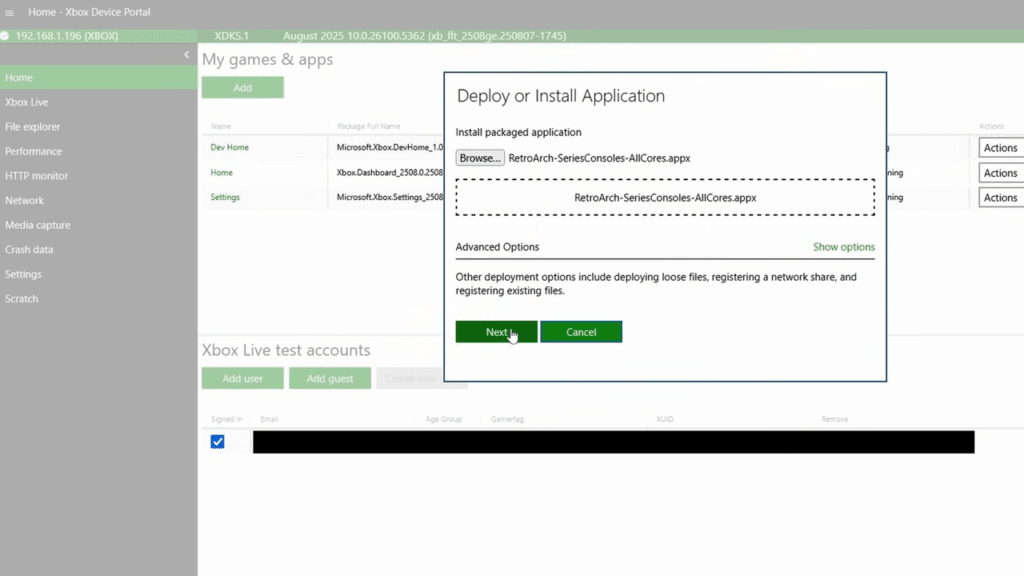
Head back to the Xbox Device Portal and under my games and apps, click Add and then choose file. Start one by one, so RetroArch first, then click Next and Start. Click Done then repeat for any other emulators you grabbed.
On your Xbox – Using emulators/apps
Once you’ve done all of that, head back to your Xbox and you’ll see all your emulators under Games and apps on the home screen.
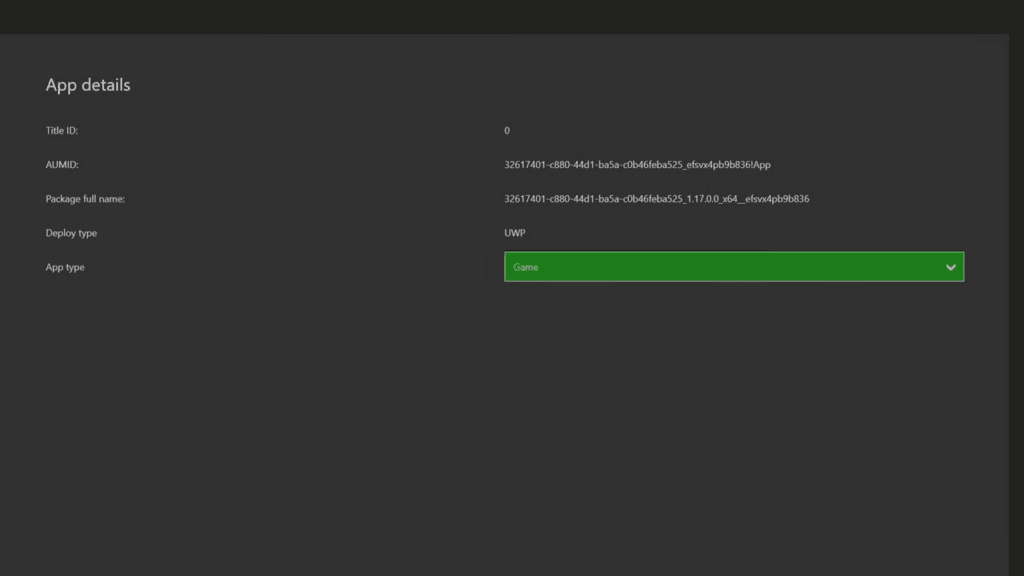
Press the back button on the controller when highlighting it, click View details, change App to Game. Do this for all your emulators.
RetroArch
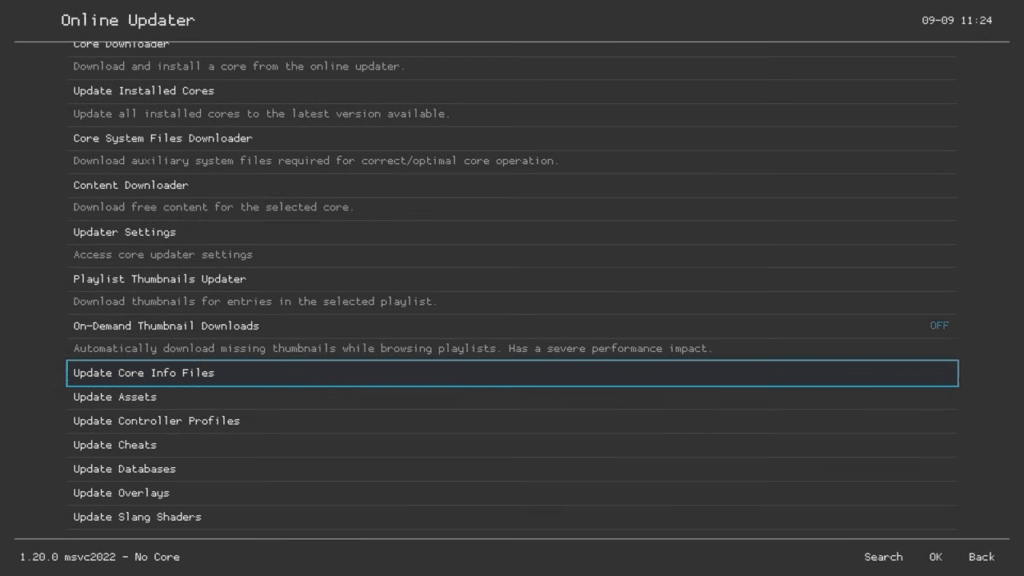
Now click RetroArch to open it. Head to Online Updater and choose update core info files, update assets, update controller profiles, update cheats, update databases, update overlays and update slang shaders. Wait until all of them are done and gone from the bottom left.
Head back now and into Settings > Directory. Let’s change some things over to the USB drive so we don’t lose anything.
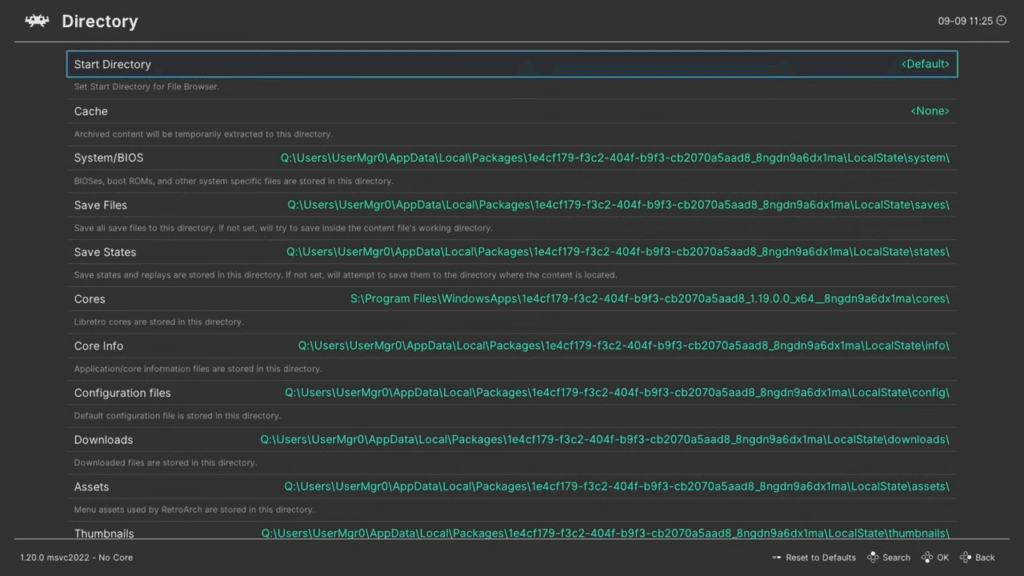
Select System/BIOS folder and click Parent Directory until you see all the drives.
Head to the E drive which should be your USB drive. Find the RetroArch folder > System folder and use this directory.
- For save files, same thing except in the RetroArch folder, select saves.
- For save states, same thing except in the RetroArch folder, select save states.
- Do not touch the Cores directory, or you will screw it all up.
- For configuration files, same thing except in the RetroArch folder, select config.
- For cheat files, same thing except in the RetroArch folder, select cheats.
Back out to Main Menu, Configuration File, Save Current Configuration.
If you just want to boot a game, click Load Content from the Main Menu, navigate to the game that’s on your USB drive wherever you put it and choose the core to use then enjoy playing.
You can just go and play games now, controls are setup and it will work – but if you want to go further to setup hotkeys, achievements, and more, then you can follow any RetroArch guide online now including mine in the description to learn how to do all of those things.
Use Start + select to get the RetroArch menu, then Close Content and Quit at the bottom to exit RetroArch.
To load a game, click Load Content from the Main Menu, navigate to the game that’s on your USB drive wherever you put it and choose the core to use then enjoy playing.
Written Guide: RetroArch Setup Guide
Dolphin
Let’s quickly setup Dolphin next.
Open Dolphin and press the Start button on your device to get to Settings.
Head to Paths and then Set Dolphin User Folder Location and select the Dolphin folder we created at the root of the SD card.
Then Add Game Path and choose the location on your drive that has your GameCube games, then do the same for your Wii games.
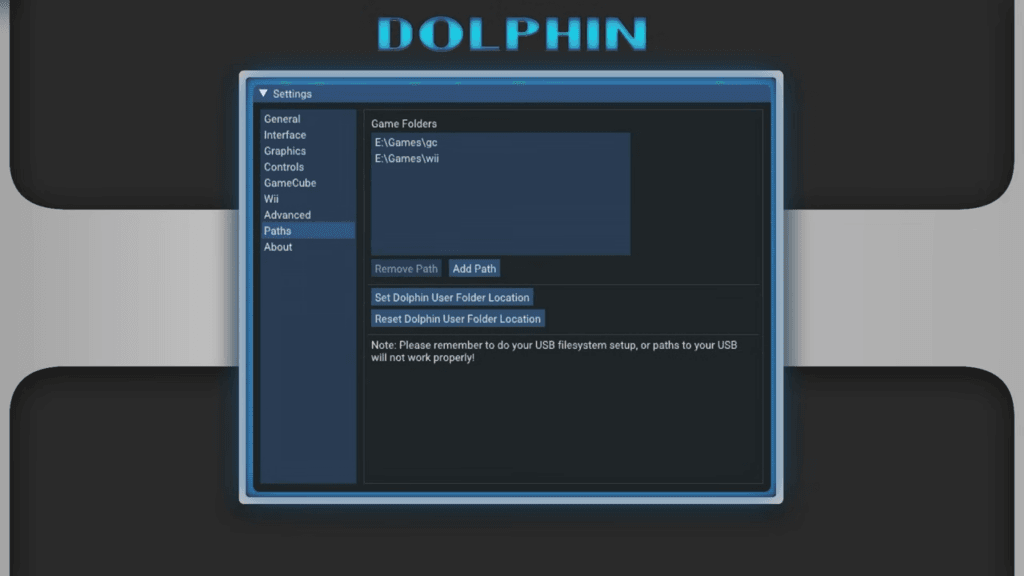
Back out and push Start to get back to the main screen.
You can now just pick a game and start playing – if you find the menu is too slow, use X to change it to list view which I found helps a lot.
Like RetroArch, at this point you can follow my Dolphin setup guide because there’s a lot more you can with Dolphin at this point if you want!
You can use the Xbox guide button and Quit to exit the app.
Written Guide: Dolphin Setup Guide
PPSSPP
Let’s do PPSSPP next.
Open it and it’s going to ask where to store settings, click Create or Choose a PSP folder and you want to create a PPSSPP folder right on the root of your SD card and select it. Click OK.
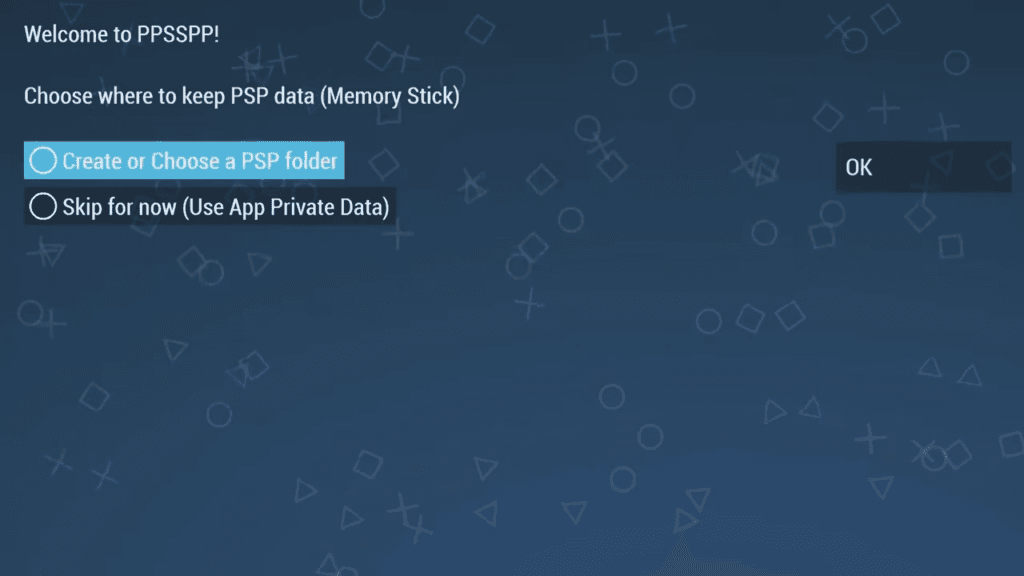
Click Browse, and navigate to your PSP ROMs folder to select it and see all your games.
Go ahead and click any game to start playing.
You can use L2 to open the in-game menu and exit the game whenever, then the Exit button on the right to exit the emulator completely.
Same as before, PPSSPP guide is right here.
Written Guide: PPSSPP Setup Guide
Xenia Canary
For Xenia Canary, open it and click Paths then click Set Config Folders Path and set it to that Xenia folder we created on the E Drive.
Now click Add Path and this time navigate to where you put your Xbox 360 games.
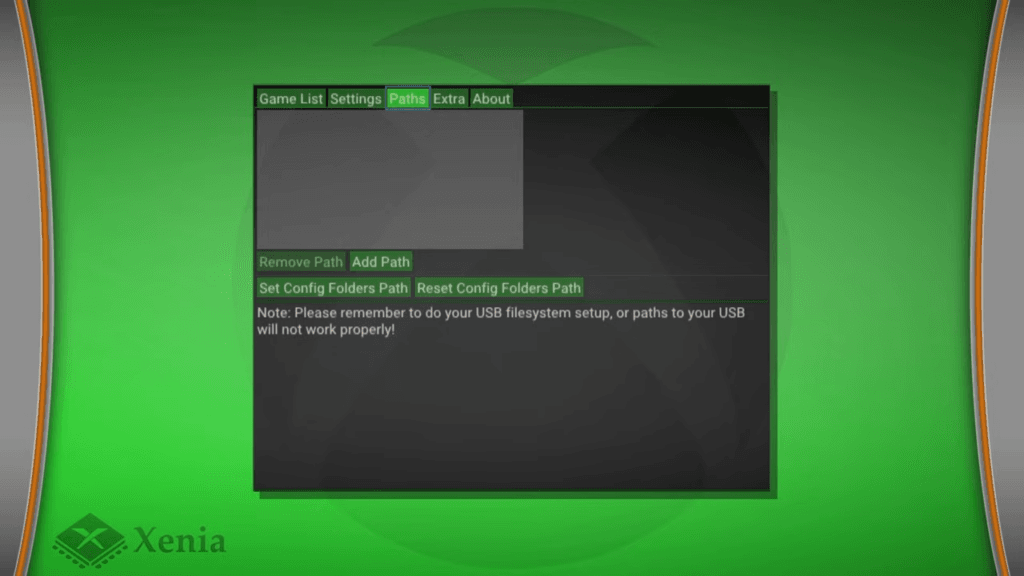
It’s important to note, you cannot have ISO file type Xbox 360 games, they won’t work. There is an ISO to ZAR converter that you can use for that purpose.
You can find the link to it here: https://www.mediafire.com/file/5ozuaw1q21xml8x/ISO_to_ZAR.zip/file.
When you download the zip, extract the zip, put the game ISO in the folder with the files and run the Extract ISO & Compress to ZAR.bat file. If the bat file does not run and automatically closes, make sure you have vcredist installed: https://aka.ms/vc14/vc_redist.x86.exe
Head to Game List and boot up a game to start playing!
To exit, use the guide button and Quit.
XBSX2
Lastly we have XBSX2 which is our PS2 games emulator.
Open it and head to Settings then BIOS Settings. Change Search Directory to the E Drive > XBSX2 > BIOS folder from earlier and your BIOS should show up in BIOS selection.
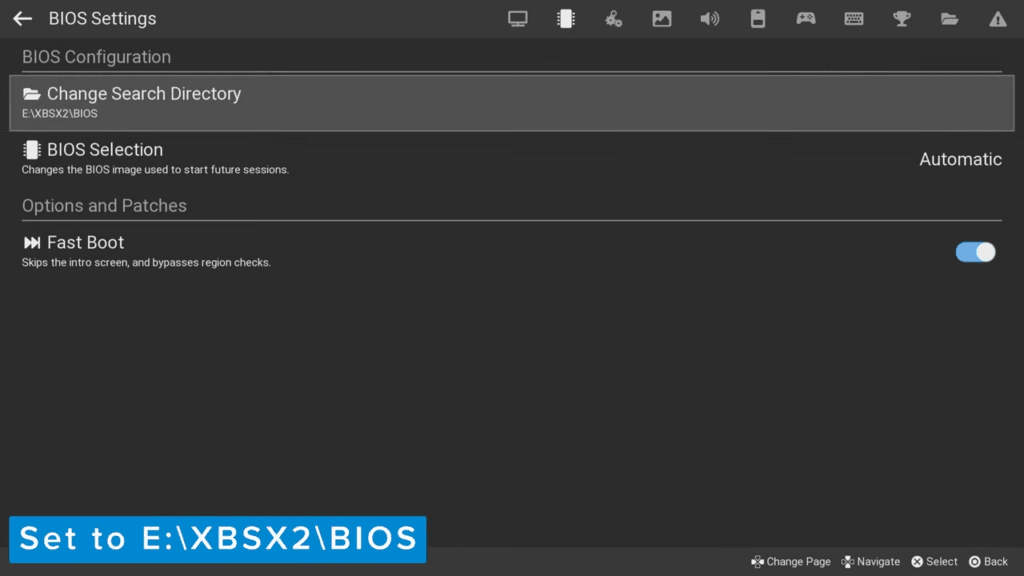
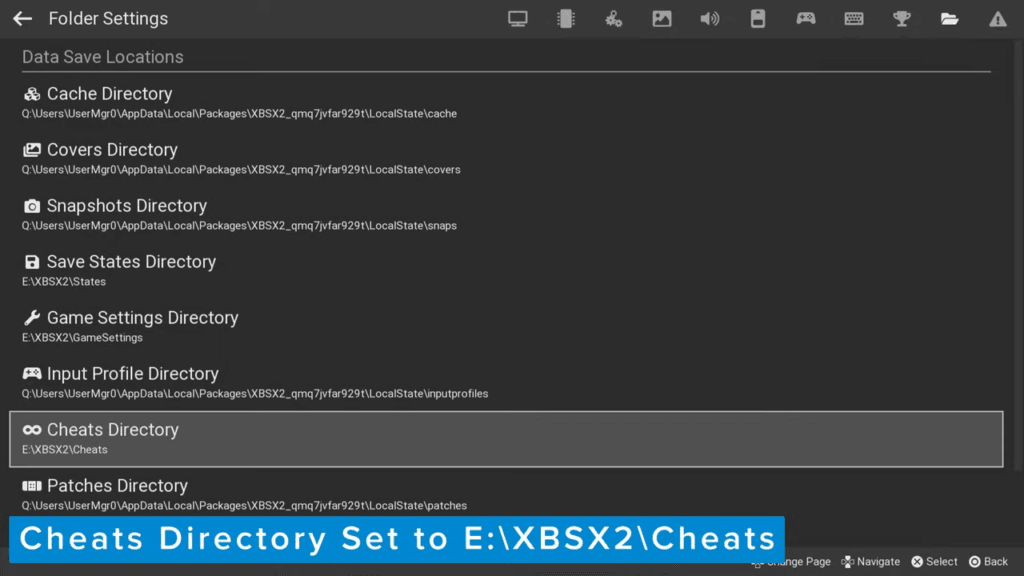
Next, head to Folder Settings and like RetroArch, we need to change the folder locations of a few:
- For Save States Directory – navigate to your E Drive > XBSX2 > States folder.
- For Game Settings Directory – navigate to your E Drive > XBSX2 > GameSettings folder.
- For Cheats Directory – navigate to your E Drive > XBSX2 > Cheats folder.
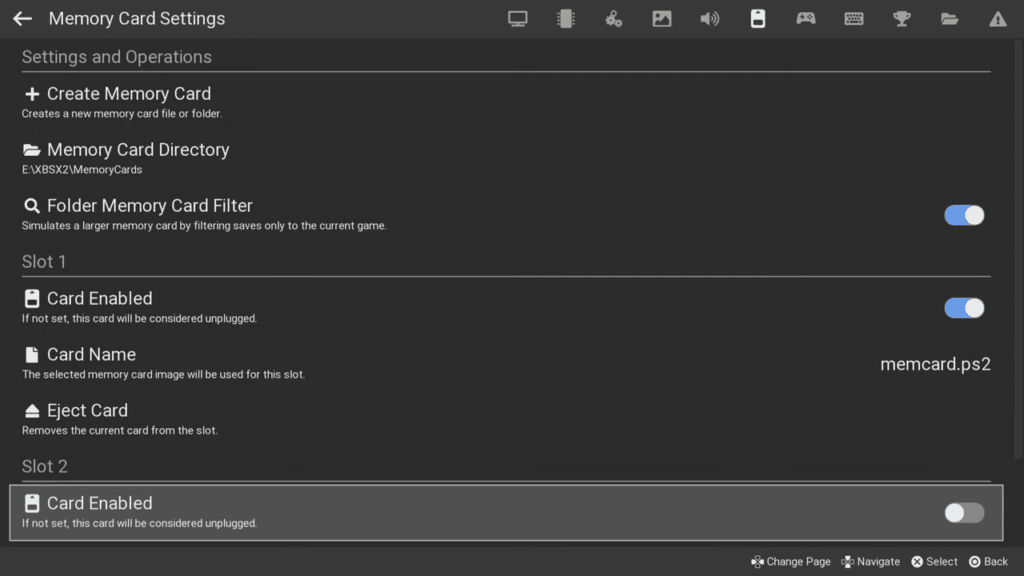
Head to the Memory Card Settings tab and change the Memory Card directory. Navigate to your E Drive > XBSX2 > MemoryCards folder.
Click Create Memory Card, push Y to get the keyboard to show up, call it memcard and choose Folder then click Create.
Make sure you choose folder based memory card to never run out of space.
Head to Slot 1 > Eject Card. Then choose Card Name and select the memcard we just created.
You can then disable Slot 2’s card.
Lastly, let’s map the controller so head to the Controllers tab, and in controller port 1 select Dualshock 2 then choose Automatic Mapping.
Back out and head to Game List, push Start and choose Add Search Directory and navigate to the E:\Games\ps2 folder.
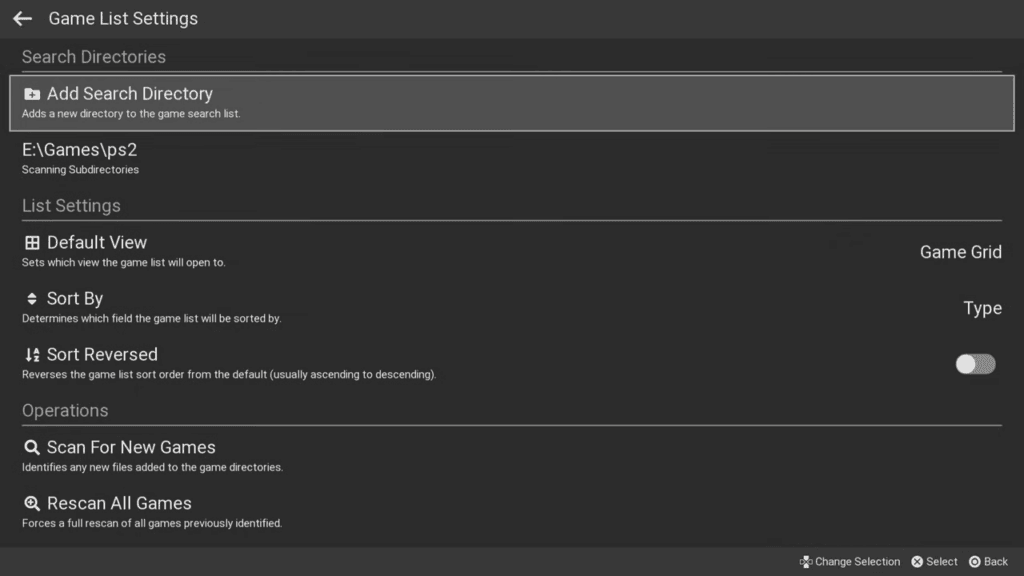
Select a game to start playing and off you go! Like the other emulators, I have a full guide for PCSX2 which XBSX2 is based on, so you can do even more if you want with the emulator and learn more about it.
Use L3+R3 to get the in-game menu, then Close Game to exit the game. Then just Exit to get back.
Written Guide: PCSX2 Setup Guide
How to get back to Retail mode
Whenever you want to head back to Retail mode for the Xbox, from the home screen click Leave Dev Mode and make sure delete side loaded games and apps is unchecked, it is by default but if you check this, it will just reset everything we did today. Click OK.
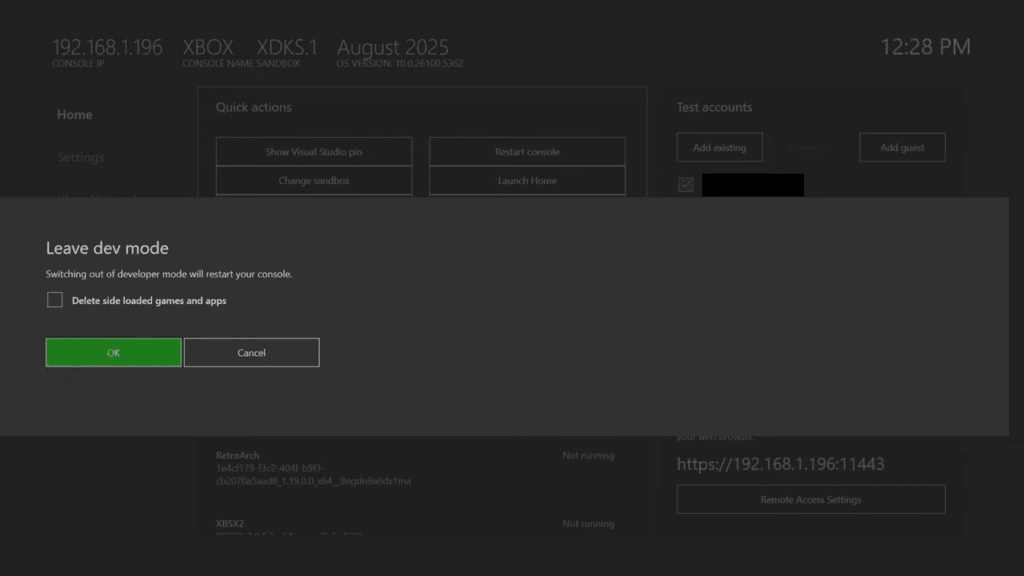
To head back to Dev mode, just click on the Dev mode activation app in Retail mode and click Switch and restart to jump back.
What else can you do?
You may have noticed on that Xbox Devstore that you can do a lot more than just games. In the Media Apps section, you can install Kodi, Twitch, Youtube, VLC and more.
There’s even a frontend to easily launch all your retro games using Retropass. The games section has a ton of games you can install too.
But that’s all we have for today. Enjoy your new emulation box Xbox Series S or X, it’s awesome.
